Setting Up Your Space: It’s More Than Just a Mic
Recording guitar isn’t just about plugging in and hitting record. Your environment plays a huge role. Think about it: a room with lots of hard surfaces will give you a bright, reflective sound, while a room with carpets and soft furniture will absorb those reflections, giving you a warmer, more controlled tone.
Room Acoustics: Taming the Beast
You don’t need a professional studio to get good results. Even simple things like hanging blankets or moving furniture can make a big difference. Try experimenting with different positions for your mic and amp to see how the room interacts with your sound. If you’re serious, consider investing in some acoustic panels. They’re not as expensive as you might think, and they can really tame those unwanted reflections.
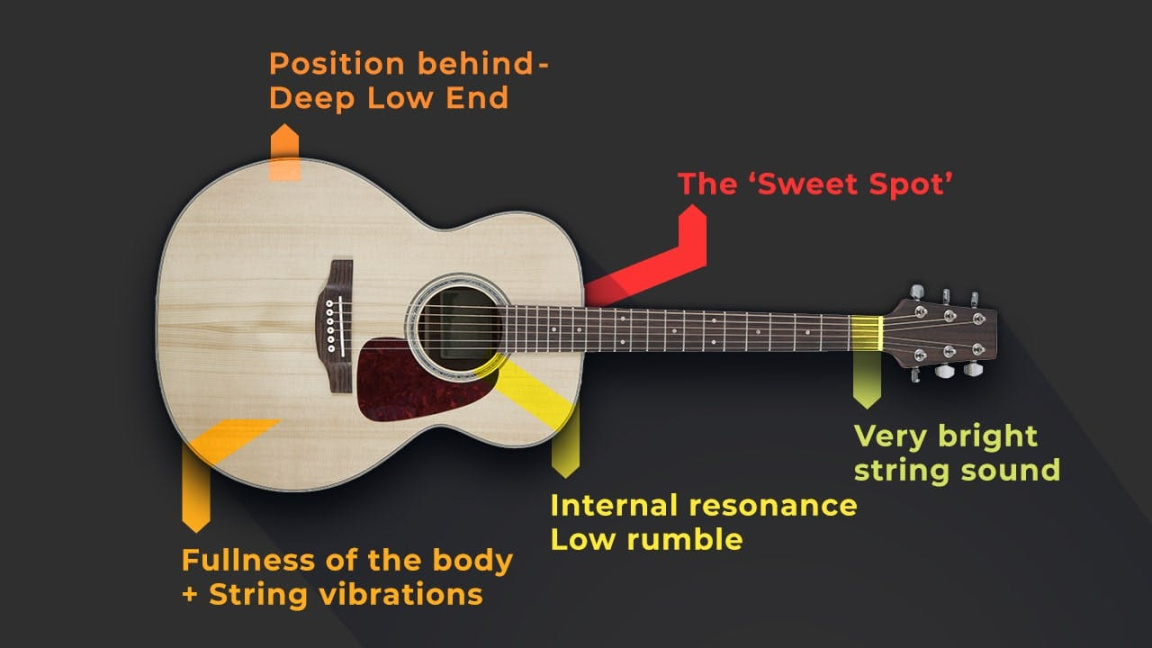
Mic Placement: The Sweet Spot
This is where the magic happens. A slight change in mic position can drastically alter your tone. Start by placing your mic a few inches from the speaker, directly in front of the center cone. This is a good starting point, but don’t be afraid to experiment. Move the mic closer or further away, and try angling it slightly off-axis. You’ll be surprised at how much difference it makes.
Choosing the Right Mic: Your Sonic Palette

Dynamic mics like the Shure SM57 are industry standards for a reason. They’re rugged, reliable, and they sound great on guitar amps. Condenser mics, on the other hand, can capture more detail and nuance, but they’re also more sensitive to room noise. If you’re just starting out, a good dynamic mic is a solid choice. But as you get more experienced, consider adding a condenser mic to your arsenal for those clean, pristine tones.
Dialing In Your Tone: It’s All About the Signal Chain
Before you hit record, make sure your tone is dialed in. This means getting your amp settings right, choosing the right pedals, and making sure your guitar is in tune.
Amp Settings: Finding Your Voice
Don’t be afraid to experiment with your amp settings. Start with a clean tone and gradually add gain until you find the sweet spot. Too much gain can make your recordings sound muddy and undefined. Pay attention to your EQ settings as well. A little tweak here and there can make a big difference.
Pedal Power: Shaping Your Sound
Pedals are a great way to add character to your guitar tone. But be careful not to overdo it. Too many pedals can muddy your signal and make your recordings sound cluttered. Use them sparingly, and focus on getting a good base tone from your amp.
Tuning: The Foundation of Good Tone
This might seem obvious, but it’s crucial. Make sure your guitar is perfectly in tune before you start recording. Even a slightly out-of-tune guitar can sound jarring in a recording. Use a good tuner, and double-check your tuning before each take.
Recording Techniques: Capturing the Performance
Now that your setup is dialed in, it’s time to hit record. But there are a few things you can do to ensure you capture the best possible performance.
Layering: Building a Wall of Sound
Layering is a common technique used in guitar recording. It involves recording multiple takes of the same part and then panning them left and right. This can create a huge, wide sound that fills the mix. But be careful not to overdo it. Too many layers can make your recordings sound cluttered and muddy.
Double Tracking: Adding Thickness and Depth
Double tracking is similar to layering, but it involves recording two slightly different takes of the same part. This can add thickness and depth to your sound, making it sound more powerful and impactful. Again, use it sparingly.
Using a DI Box: Clean and Clear
A DI (direct input) box allows you to record your guitar signal directly into your audio interface, bypassing your amp. This can be useful for capturing a clean, unprocessed tone that you can then re-amp later. It’s also a great way to record bass guitar.
Post-Processing: Polishing Your Sound
Once you’ve recorded your guitar tracks, it’s time to polish them up with some post-processing. This can involve using EQ, compression, and reverb to shape your tone and make it sit better in the mix.
EQ: Sculpting Your Tone
EQ is a powerful tool that allows you to boost or cut specific frequencies in your audio signal. Use it to remove unwanted frequencies, such as low-end rumble or harsh high-end, and to enhance the frequencies that you want to emphasize.
Compression: Controlling Dynamics
Compression is used to control the dynamic range of your audio signal. It can make your recordings sound louder and more consistent, but it can also make them sound squashed and lifeless if used excessively. Use it sparingly, and focus on getting a natural-sounding compression.
Reverb and Delay: Adding Space and Depth
Reverb and delay can add space and depth to your recordings, making them sound more immersive and atmospheric. But be careful not to overdo it. Too much reverb can make your recordings sound washed out and muddy.
Conclusion:
Recording guitar at home is a continuous learning process. It takes time, patience, and a willingness to experiment. Don’t be afraid to try new things, and don’t get discouraged if your first few recordings don’t sound perfect. The more you practice, the better you’ll get. Focus on getting a good base tone, experimenting with mic placement, and learning the basics of post-processing. With a little effort, you can create professional-sounding guitar recordings that you’ll be proud to share. Keep experimenting, keep practicing, and most importantly, have fun.

