Mastering Barre Chords: A Step-by-Step Guide

— How To Play Barre Chords: A Beginner’s Guide to Mastering the Guitar’s Power Chords Barre chords. They’re the cornerstone of rock, pop, and countless

King Of Chords

How To Play Barre Chords: A Beginner’s Guide to Mastering the Guitar’s Power Chords

Barre chords. They’re the cornerstone of rock, pop, and countless other guitar-driven genres. But for beginners, they can feel like an insurmountable wall. The hand cramps, the buzzing strings, the sheer frustration—it’s a common rite of passage for any aspiring guitarist. However, mastering barre chords is less about brute strength and more about technique, patience, and a bit of understanding. Let’s break down how to conquer these formidable chords and unlock a whole new world of musical possibilities.

Understanding the Barre Chord Concept

Before diving into the mechanics, it’s crucial to grasp the fundamental concept. A barre chord essentially transforms any open chord shape into a movable chord. You’re using your index finger to “barre” or press down all the strings at a specific fret, effectively creating a new “nut” for the guitar. This allows you to play the same chord shape in different keys by simply moving it up or down the fretboard.
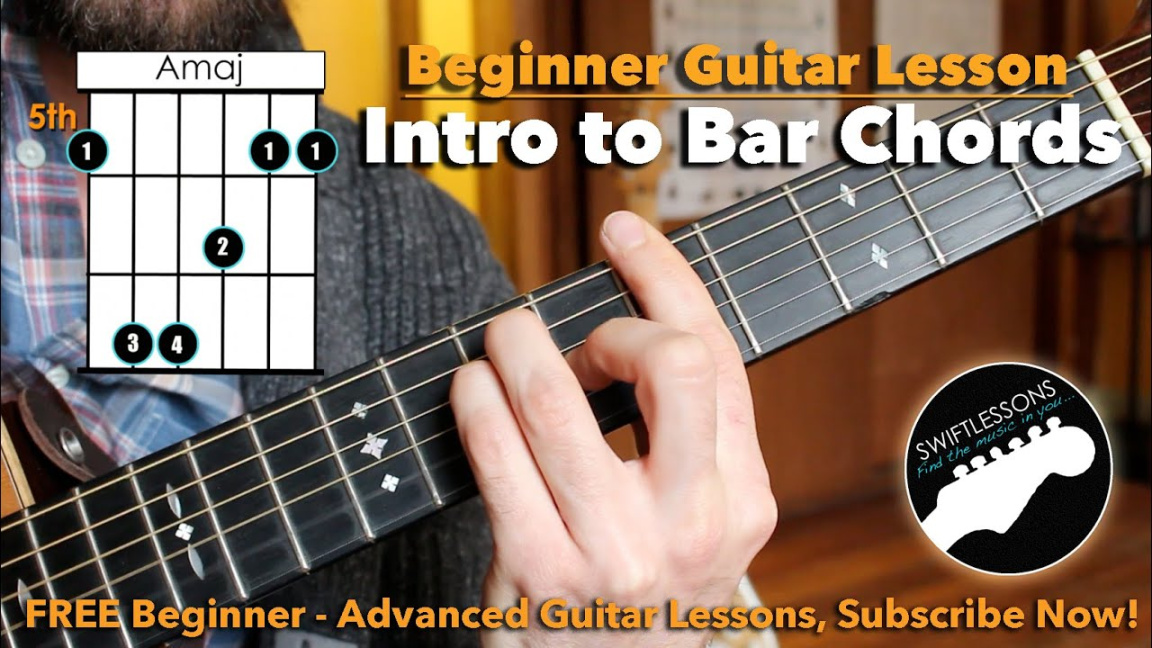
How to REALLY Play Bar Chords - A Beginner Guitar Tutorial
How to REALLY Play Bar Chords – A Beginner Guitar Tutorial

Think of it like this: you’re creating a portable open chord. The E major open chord shape, for instance, can become an F major, F# major, G major, and so on, just by moving it and barring the appropriate fret. This versatility is what makes barre chords so essential.

Setting Up for Success: Proper Posture and Hand Position

The foundation of successful barre chord playing lies in your posture and hand position. A relaxed, yet firm grip is key.

Posture: Sit upright with your back straight. Avoid slouching, as this can strain your wrists and make it harder to apply consistent pressure. Keep your guitar at a comfortable angle, ensuring your fretting hand can move freely.

  • Thumb Position: Your thumb should be positioned behind the neck, roughly opposite your middle finger. It should act as an anchor, providing stability and support for your fretting hand. Avoid wrapping your thumb around the neck, as this restricts movement and makes barring difficult.
  • Index Finger Placement: The index finger is the star of the show. It needs to press down all the strings evenly. Aim to use the side of your index finger, rather than the tip, to create a consistent barre. Apply firm pressure, but avoid excessive tension.
  • Other Fingers: The remaining fingers (middle, ring, and pinky) will form the chord shape. Ensure they’re arched and pressing down on the strings cleanly, avoiding any unwanted muting.

  • Breaking Down the Technique: Step-by-Step

    Now, let’s break down the technique into manageable steps.

    Start with the E Shape Barre Chord: This is often the first barre chord beginners learn. It’s based on the open E major chord shape.

  • Place your index finger across all six strings at the first fret.
  • Position your middle finger on the third string, second fret.
  • Place your ring finger on the fifth string, third fret.
  • Place your pinky finger on the fourth string, third fret.
  • Applying Pressure: The key to a clean barre chord is consistent pressure. Don’t try to squeeze with all your might. Instead, focus on applying even pressure across all the strings with your index finger.
  • Checking for Buzzing: Strum each string individually to check for buzzing or muted notes. If you hear buzzing, adjust your finger pressure or reposition your fingers slightly. Ensure your index finger is pressing down firmly and evenly.
  • Moving the Chord: Once you can play the E shape barre chord cleanly, try moving it up the fretboard. For example, moving it up one fret makes it an F major chord, two frets a F# major, and so on.
  • The A Shape Barre Chord: Another essential barre chord is based on the open A major chord shape.
  • Place your index finger across all five strings (excluding the sixth string) at a specific fret.
  • Position your middle finger on the third string, one fret higher than your index finger.
  • Place your ring finger on the fifth string, one fret higher than your middle finger.
  • Place your pinky finger on the fourth string, one fret higher than your middle finger.
  • Practice Regularly: Like any skill, mastering barre chords requires consistent practice. Start with short practice sessions and gradually increase the duration as your hand strength and endurance improve.
  • Use a Metronome: A metronome can help you maintain a steady rhythm and improve your timing.
  • Listen Carefully: Pay attention to the sound of your chords. Listen for any buzzing or muted notes and adjust your technique accordingly.

  • Common Challenges and Solutions

    Beginners often encounter several challenges when learning barre chords.

    Hand Cramps: This is a common issue. Take frequent breaks and stretch your hands. Gradually increase your practice time as your hand strength improves.

  • Buzzing Strings: This usually indicates insufficient pressure or improper finger placement. Experiment with different finger positions and pressure levels.
  • Difficulty Moving the Chord: Moving the chord smoothly requires practice. Start by moving it slowly and gradually increase your speed.
  • Lack of Clarity: Ensure that your fingers are arched and not muting adjacent strings.

  • Building Hand Strength and Endurance

    Developing hand strength and endurance is crucial for playing barre chords comfortably.

    Finger Exercises: Regularly perform finger exercises to strengthen your hand muscles.

  • Squeezing a Stress Ball: Squeezing a stress ball can help build grip strength.
  • Playing Regularly: Consistent practice is the most effective way to build hand strength and endurance.

  • Conclusion

    Barre chords are a fundamental skill for any guitarist. While they may seem challenging at first, with consistent practice and a focus on proper technique, you can master them. Remember to prioritize proper posture, hand position, and apply even pressure. Start with the E shape barre chord and gradually progress to the A shape. Don’t be discouraged by initial difficulties; every guitarist faces them. By breaking down the technique into manageable steps and practicing regularly, you’ll unlock a new level of guitar playing and open the door to a vast world of musical expression. Mastering barre chords is a journey, not a race. So, be patient, persistent, and enjoy the process. Happy playing!

    Related Post

    Leave a Comment


    Ads - Before Footer